Apple Pay
Embedded Payment
Introduction
To provide a better user experience to your Apple Pay users, MyFatoorah is providing the Apple Pay embedded payment.
MyFatoorah Apple Pay Embedded Payment is a Javascript library that provides the Apple Pay button to your website. This button can be placed on your checkout page. When your customers click the button, MyFatoorah will direct the customers to the Apple Pay payment sheet page to authorize the payment. Then you can smoothly complete the payment using ExecutePayment endpoint by following the below steps.

Apple Pay Button

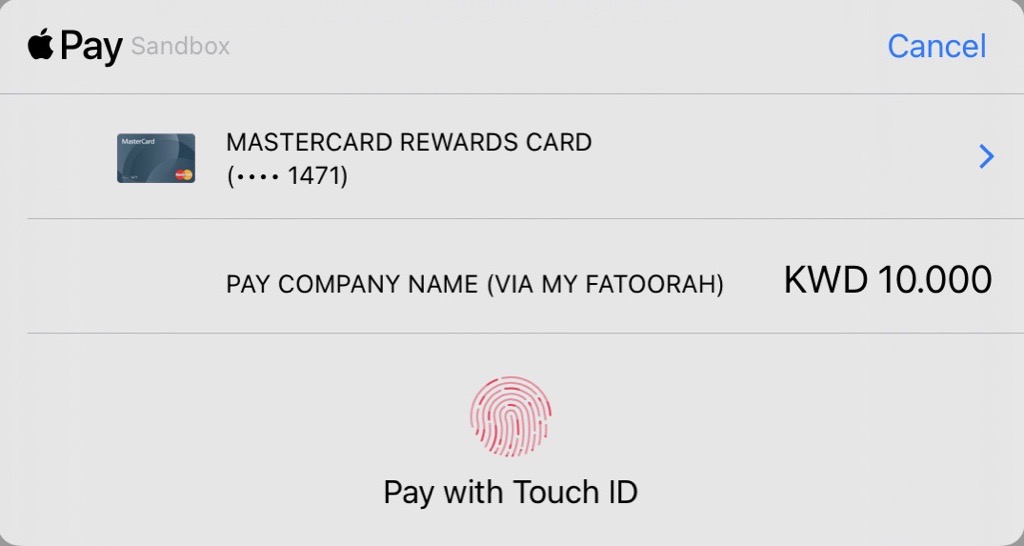
Apple Pay Payment Sheet Page
How it Works
Before You startKindly refer to the prerequisite section in the Embedded Payment.
Apple Pay Domain VerificationTo enable Apple Pay, you must verify your domain. For detailed instructions, please refer to our Apple Pay Domain Verification Guide.
The following detailed steps will explain how to add the MyFatoorah Apple Pay Embedded Payment to your checkout page.
1. Include the Javascript library
// Test Environment
<script src="https://demo.myfatoorah.com/applepay/v4/applepay.js"></script>

// Live Environment For Kuwait, Bahrain, Jordan, and Oman
<script src="https://portal.myfatoorah.com/applepay/v4/applepay.js"></script>

// Live Environment for UAE
<script src="https://ae.myfatoorah.com/applepay/v4/applepay.js"></script>

// Live Environment for Saudi Arabia
<script src="https://sa.myfatoorah.com/applepay/v4/applepay.js"></script>

// Live Environment for Qatar
<script src="https://qa.myfatoorah.com/applepay/v4/applepay.js"></script>

// Live Environment for Egypt
<script src="https://eg.myfatoorah.com/applepay/v4/applepay.js"></script>
2. Add the form
You need to define a div element with a unique id attribute. The button will be loaded inside this div after passing the div id to the configuration variable.
<div id="card-element"></div>3. Apple Pay Configuration
Now you need to add the configuration variables. Place the following snippet in a new script tag after loading the library in step 1, and replace the sessionId parameter with the "SessionId" you receive from the InitiateSession Endpoint. Moreover, you need to add the country code, currency code, and invoice amount.
For the currencyCode parameter check our list of ISO Lookups.
var config = {
    sessionId: "", // Here you add the "SessionId" you receive from InitiateSession Endpoint.
    countryCode: "KWT", // Here, add your Country Code.
    currencyCode: "KWD", // Here, add your Currency Code.
    amount: "10", // Add the invoice amount.
    cardViewId: "card-element",
    callback: payment,
    sessionStarted: sessionStarted,
    sessionCanceled: sessionCanceled
};

myFatoorahAP.init(config);
This will load the Apple Pay button on your page. When customers click the button, they will be redirected to the Apple Pay payment sheet to authorize the payment.
Update Display Amount (Optional)
You can update the amount to be displayed in the payment sheet after initializing the button by calling the following function:
myFatoorahAP.updateAmount(amount);4. Call the payment function to load the response
In response to the payment function, you will receive the sessionId, and information about the card used for the payment. You need to return the SessionId to the backend to continue the payment steps.
function payment(response) {
    // Here you need to pass session id to you backend here
    var sessionId = response.sessionId;
    var cardInformation = response.card;
}
Personalized Apple Pay Button:
Achieve a personalized look for the Apple Pay button by following these steps:
- Omit the div element specified in step #2.
- Exclude the cardViewId field from the config object outlined in step #3.
- Create an Apple Pay button that follows the Apple Pay Button Guidelines.
- Once the customer clicks on the Apple Pay button on your checkout page, initiate the Apple Pay functionality by calling myFatoorahAP.initPayment().
5. Call the ExecutePayment Endpoint
Then, you need to send the SessionId to your server to process the actual transaction, which should be done in your backend environment using ExecutePayment endpoint.
Parameters conflictDo not pass the PaymentMethodId parameter in the ExecutePayment request and use the SessionId parameter instead. As PaymentMethodId overwrite SessionId.
The "SessionId" you receive from InitiateSession Endpoint can not be used directly in ExecutePayment Endpoint.
Updated 30 days ago
